Find out how you can include FastMap web map services in your working environment
This page shows you how to use FastMap Web Map Services in your working environment.
QGIS
If you are using QGIS, you can easily include FastMap Web Map Services into your map.
WMS
To add WMS to QGIS, from the Layer menu, Add Layer, select Add WMS/WMTS Layer.

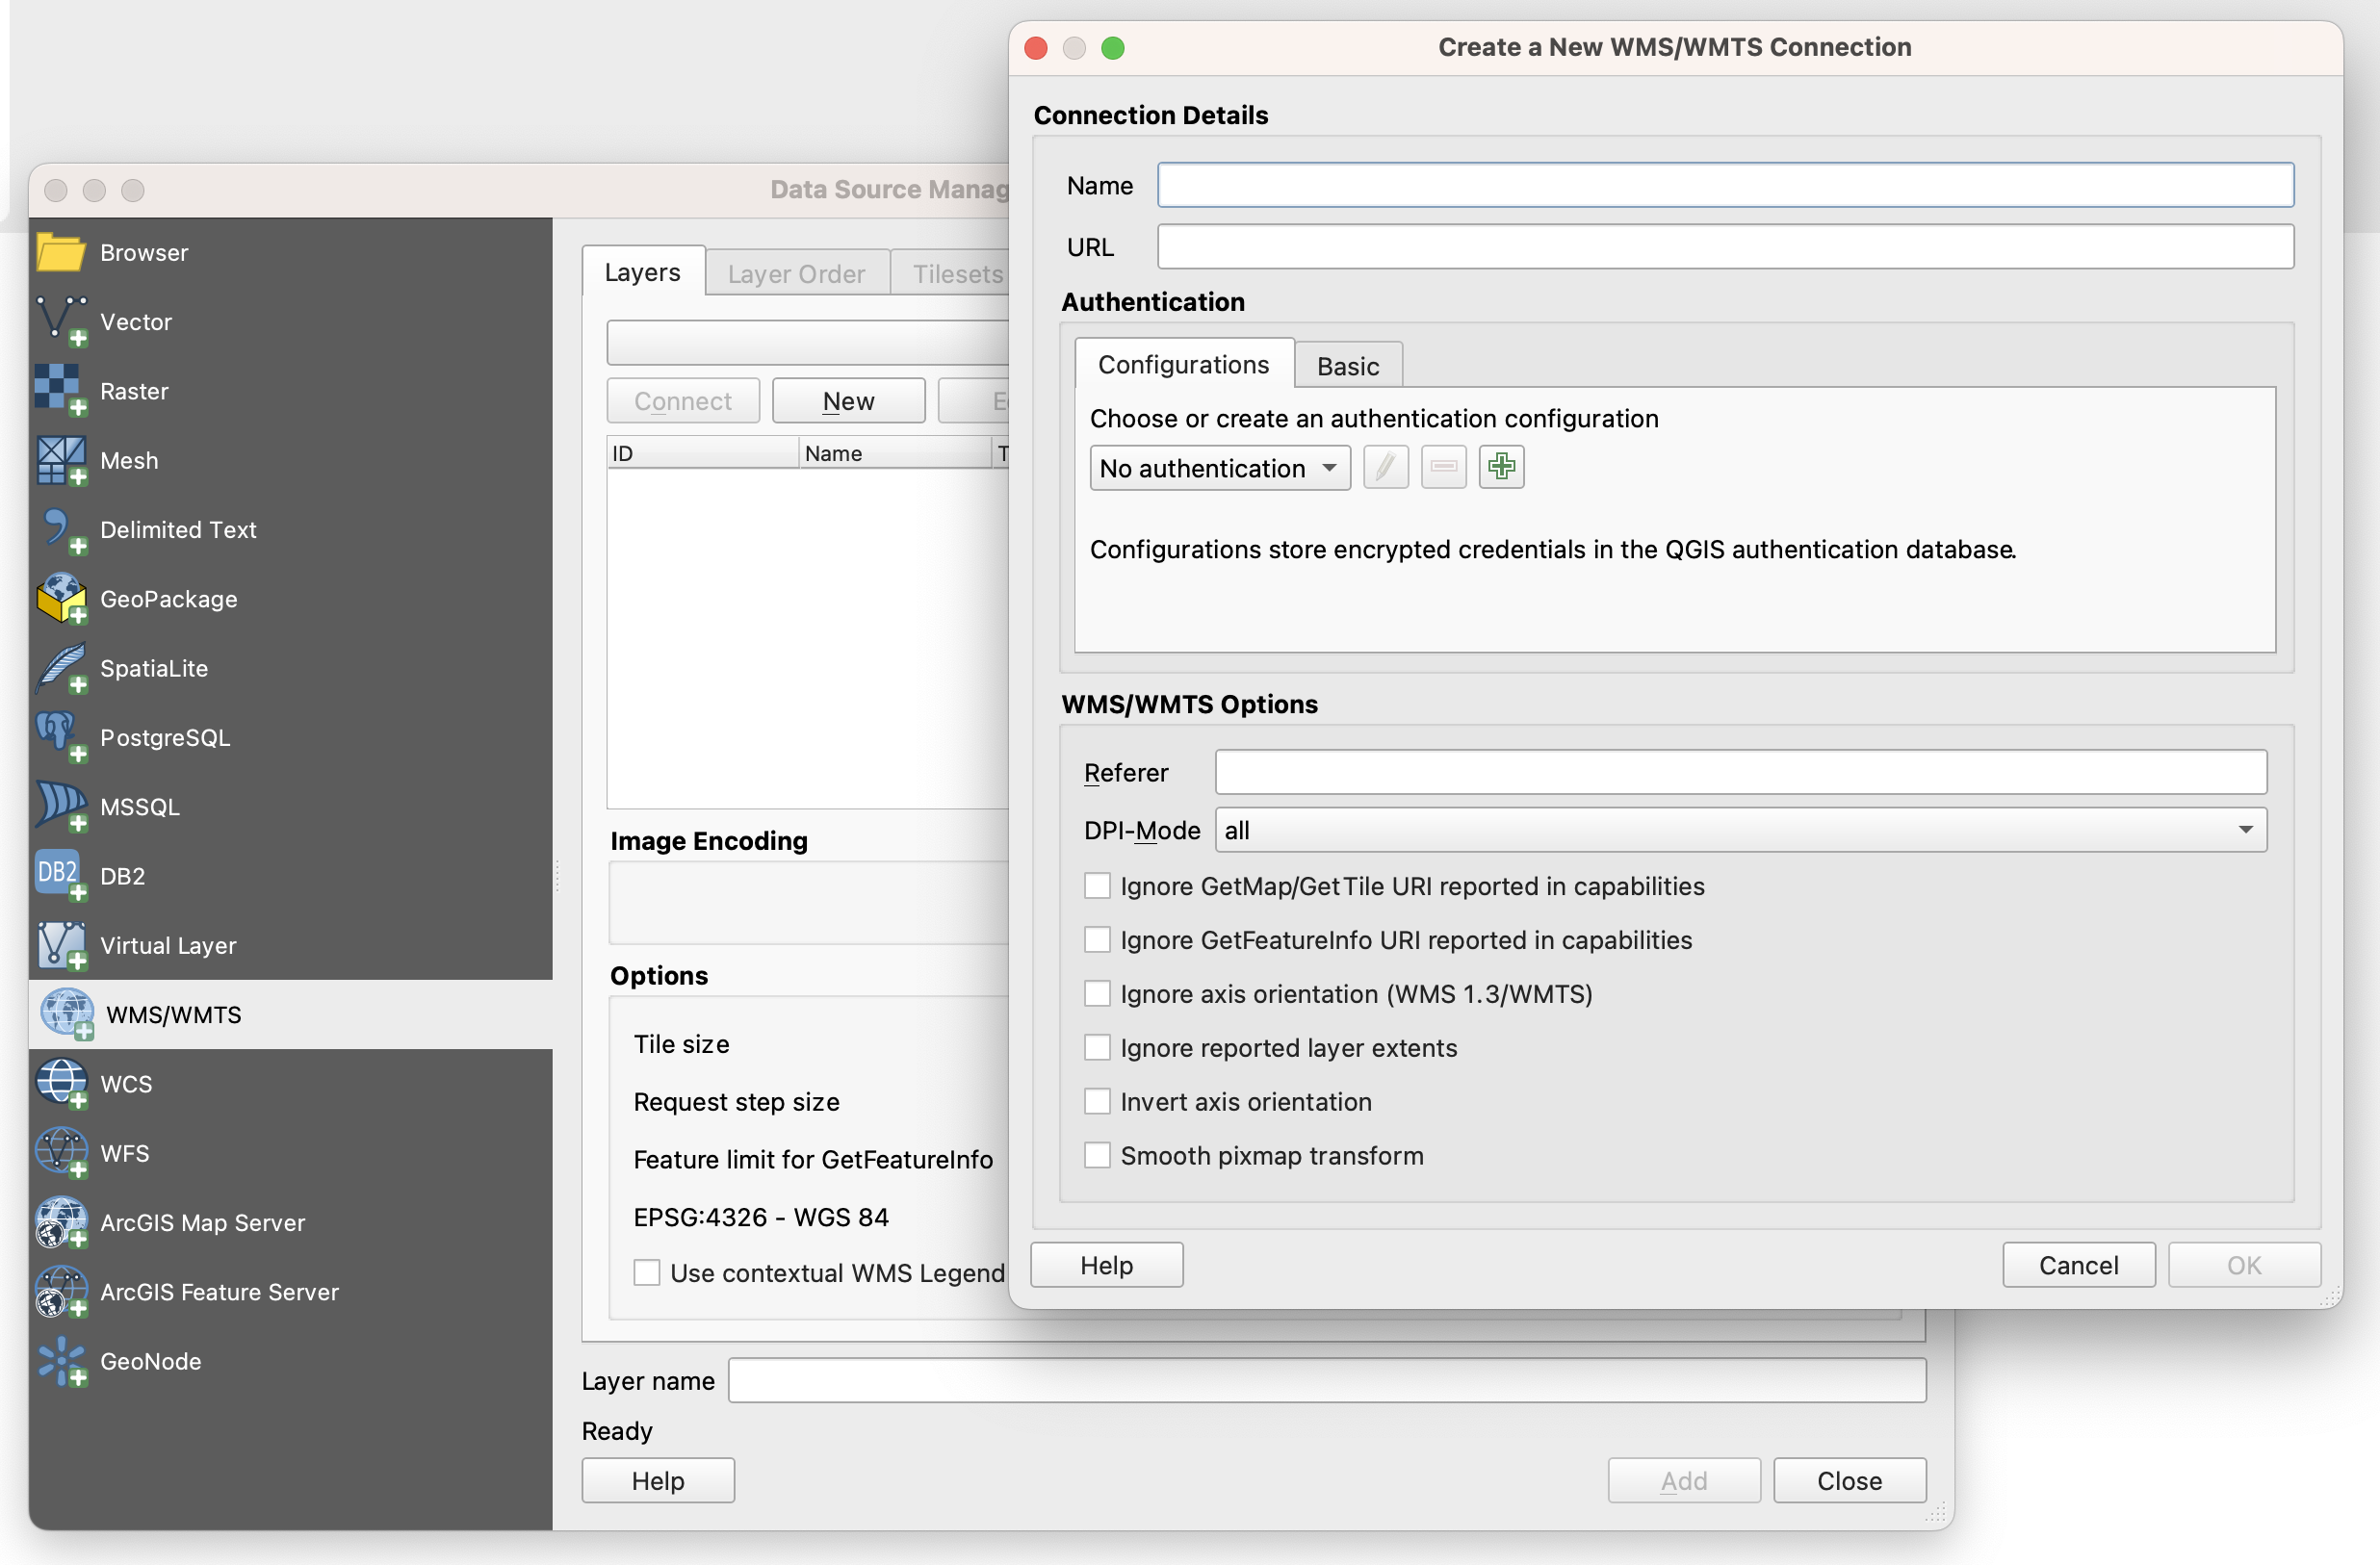
Then, in the Layers tab, click on New button so that the Create a new WMS/WMTS Connection opens. Enter your desired name in the Name box.
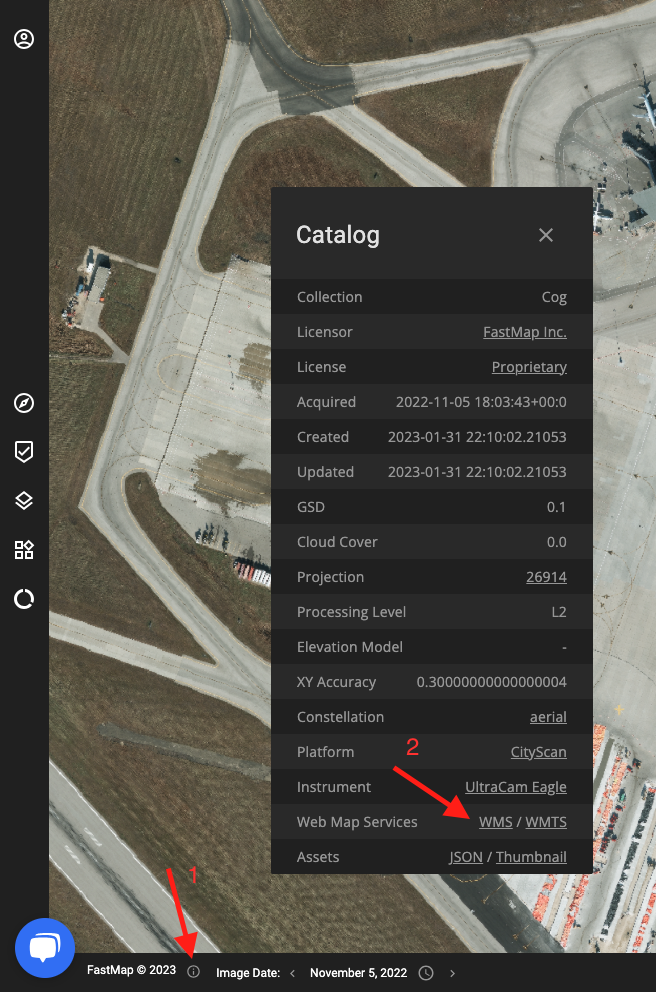
For the URL, go to the FastMap Workspace and load your desired layer. Then click on the information button in the footer of the website to see the metadata of the layer. From the metadata, click on the WMS hyperlink, so that the URL is copied to your clipboard.
The format of the URL is as follows:
https://tiles.fastmap.ai/v1/OGC/wms?LAYERS={collection_name}:{mission_name}
Providing LAYERS parameter is important.
All Web Map Services require authentication, and they can both accept API Keys or Auth0 authentication. In case you have obtained your API Key through the Workspace, you can provide your API Key as follows:
https://tiles.fastmap.ai/v1/OGC/wms?LAYERS={collection_name}:{mission_name}&APIKEY={your_API_Key}
Paste the URL in the URL box.
By default, the version of WMS is 1.3.0, if you don't provide it. In version 1.3.0, the axis are inverted. Therefore, you have to check the Invert axis orientation checkbox.
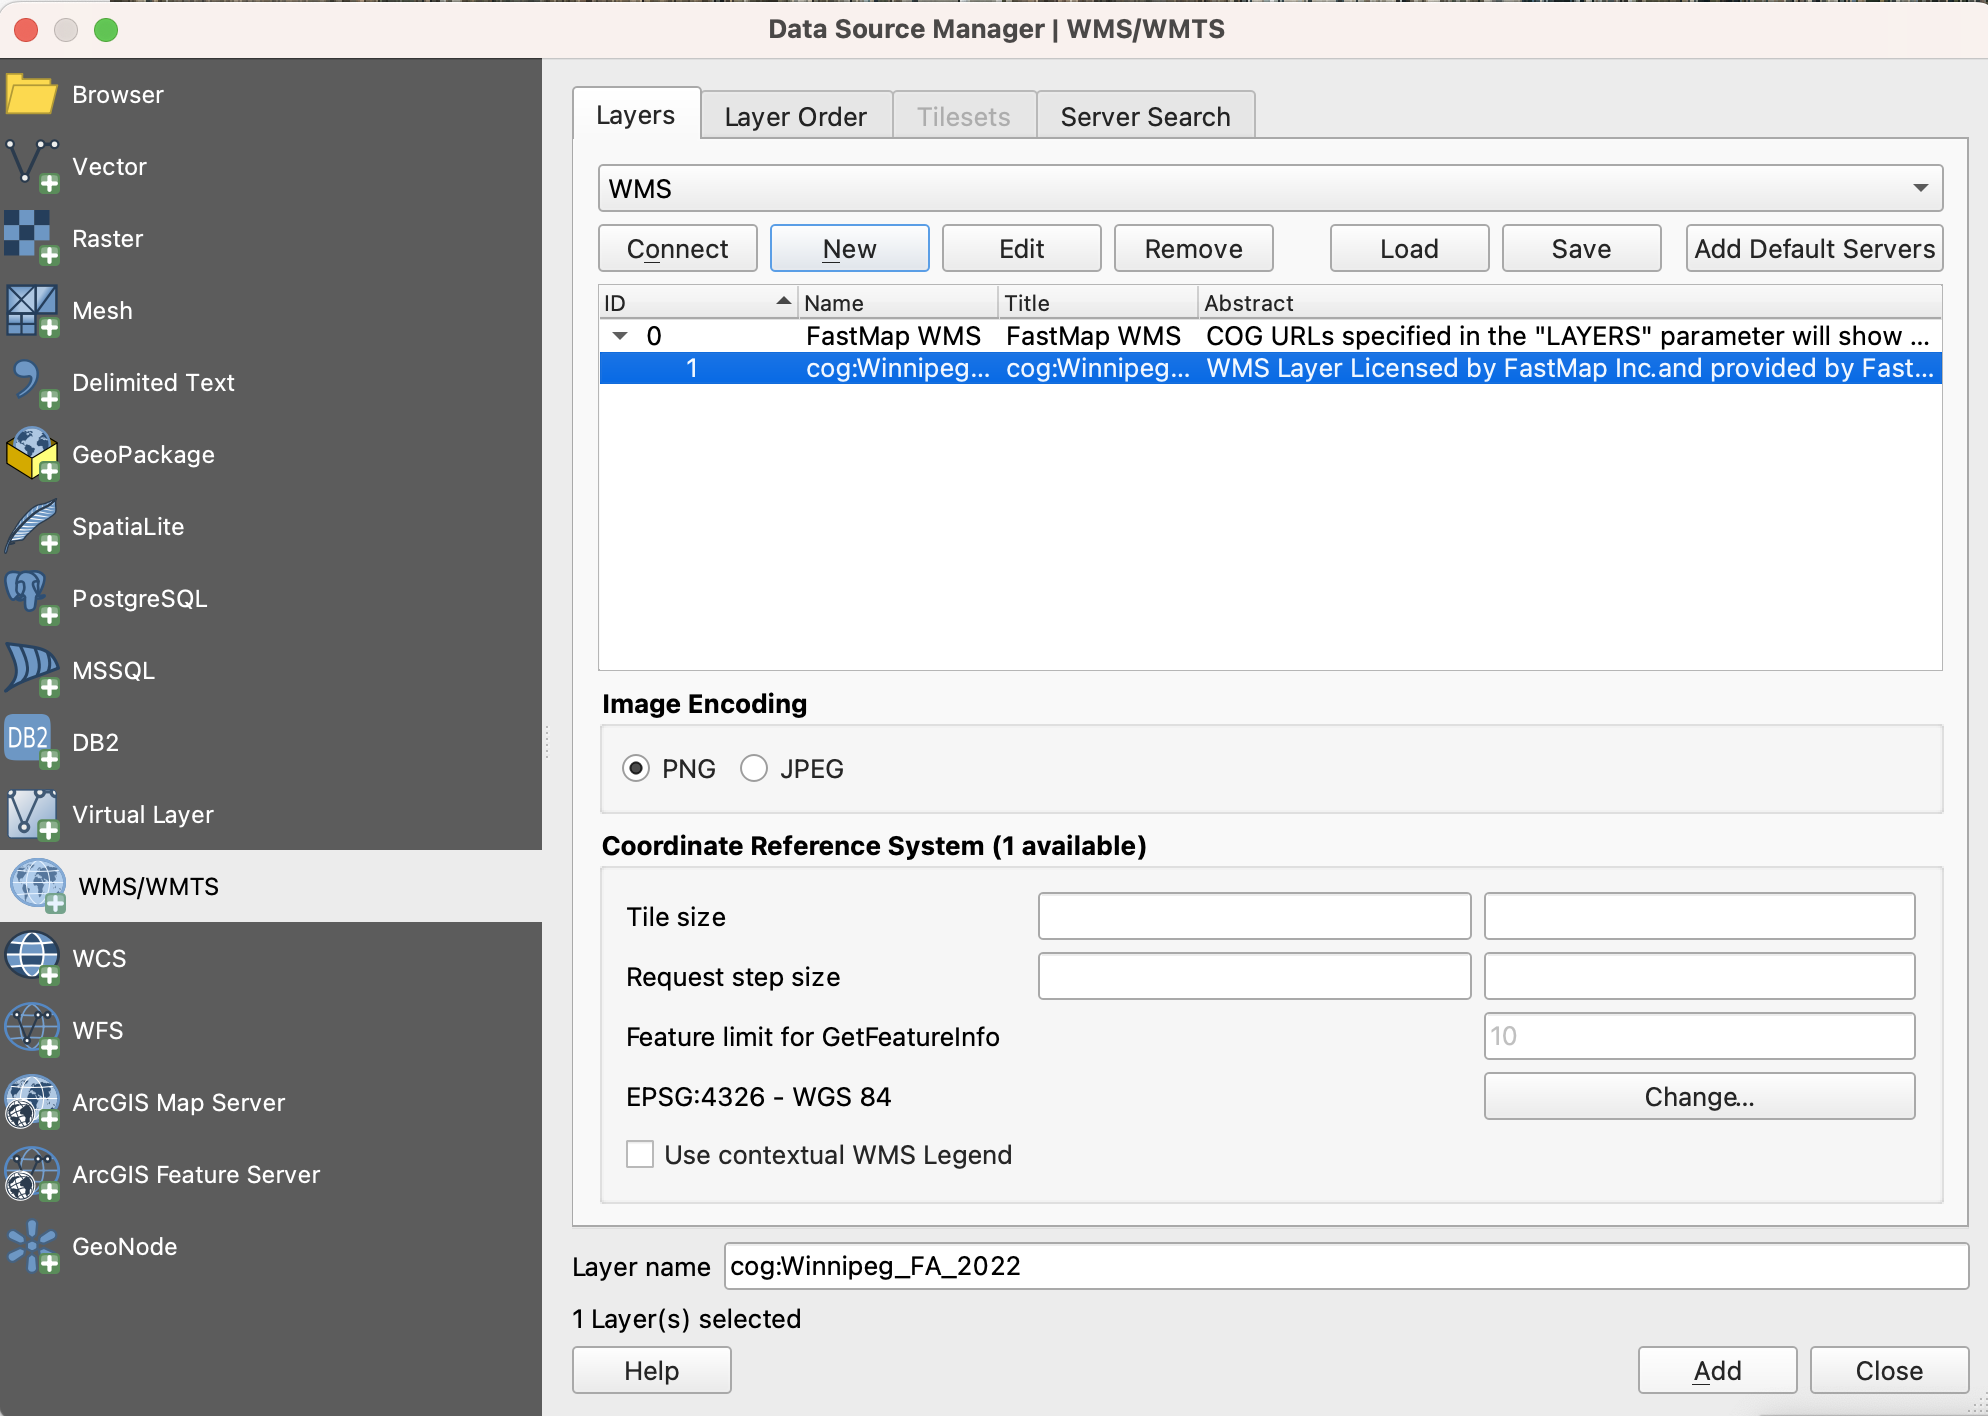
After clicking on OK button, the connection is added to your list of connections. By clicking on Connect button, you can see that your connection is working and the layer is shown to you, with a description about the its provider and licensor. Select the layer and click on Add button.
WMTS
To add WMTS to QGIS, from the Layer menu, Add Layer, select Add WMS/WMTS Layer.
Then, in the Layers tab, click on New button so that the Create a new WMS/WMTS Connection opens. Enter your desired name in the Name box.
For the URL, go to the FastMap Workspace and load your desired layer. Then click on the information button in the footer of the website to see the metadata of the layer. From the metadata, click on the WMTS hyperlink, so that the URL is copied to your clipboard.
The format of the URL is as follows:
https://tiles.fastmap.ai/v1/OGC/wmts/{collection_name}:{mission_name}/WMTSCapabilities.xml
Paste the URL in the URL box.
All Web Map Services require authentication, and they can both accept API Keys or Auth0 authentication. In case you have obtained your API Key through the Workspace, you can provide your API Key as follows:
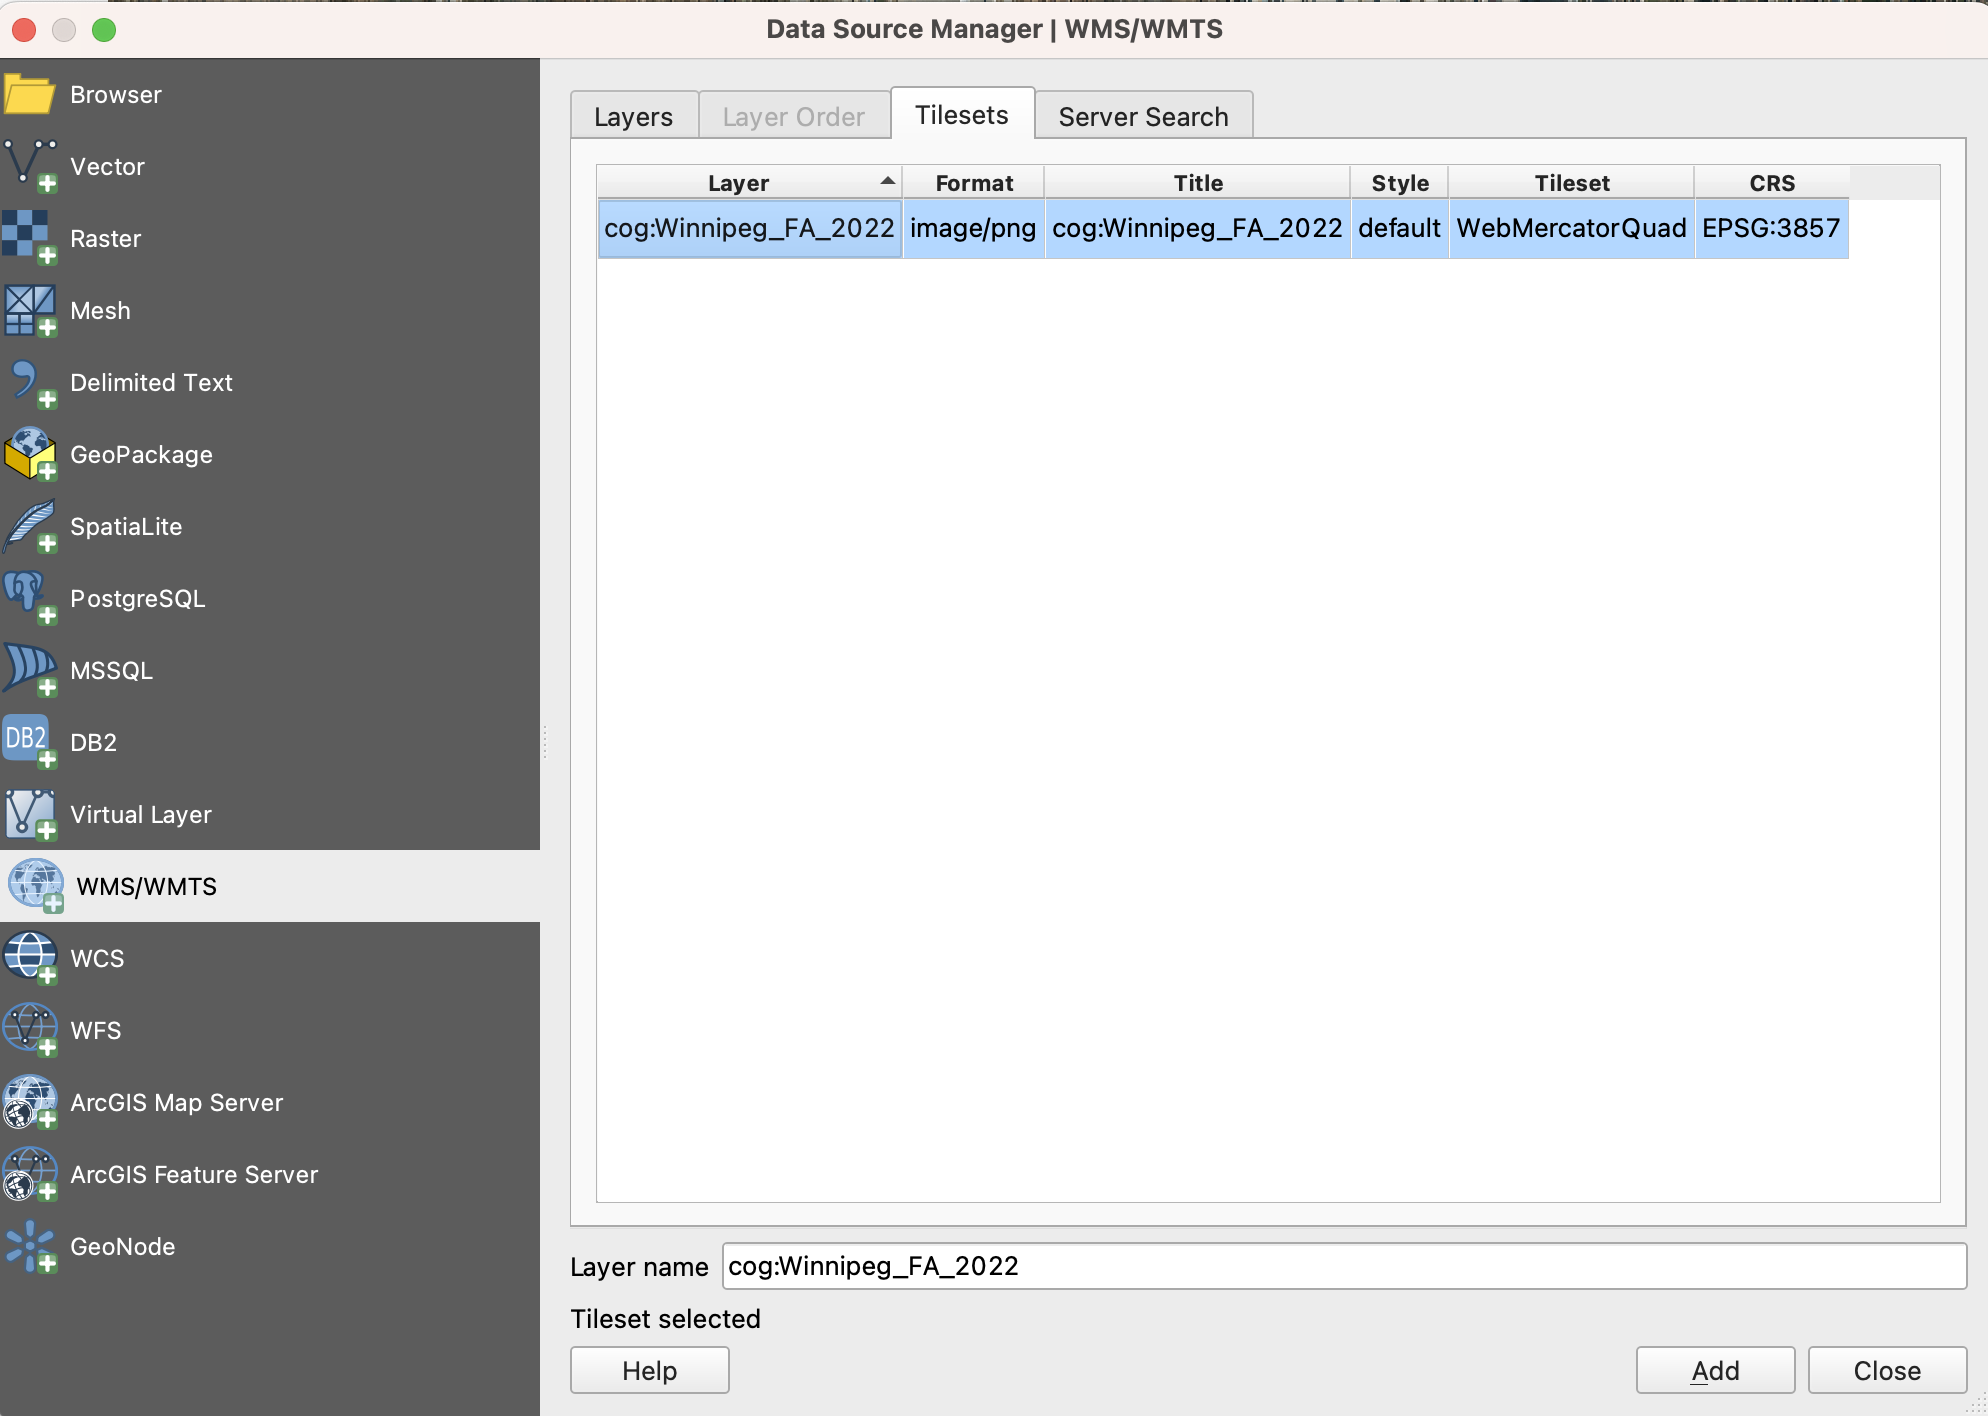
After clicking on OK button, the connection is added to your list of connections. By clicking on Connect button, you can see that your connection is working and the layer is loaded in Tilesets tab. Select the layer and click on Add button.
ArcGIS Pro
If you are using ArcGIS Pro, you can easily include FastMap Web Map Services into your map.
WMS
To add WMS to ArcGIS Pro, from the Insert tab, in the Project group, click Connections Add Connection > Server GIS Server > New WMS Server to open Add WMS Server Connection window.
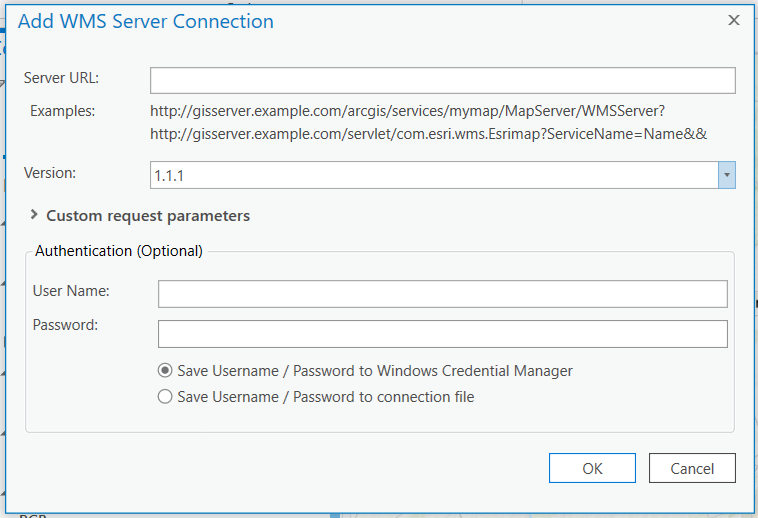
For the Server URL, go to the FastMap Workspace and load your desired layer. Then click on the information button in the footer of the website to see the metadata of the layer. From the metadata, click on the WMS hyperlink, so that the URL is copied to your clipboard.
The format of the URL is as follows:
https://tiles.fastmap.ai/v1/OGC/wms?LAYERS={collection_name}:{mission_name}
Providing LAYERS parameter is important.
Specify the Version number of the server, if applicable.
All Web Map Services require authentication, and they can both accept API Keys or Auth0 authentication. In case you have obtained your API Key through the Workspace, you can provide your API Key in the Custom request parameters section. Enter APIKEY below parameter column and your API Key in the Value column.
Click OK.
WMTS
To add WMTS to ArcGIS Pro, from Map Tab > Add Data dropdown > Add Data from Path to open Add Data From Path window.
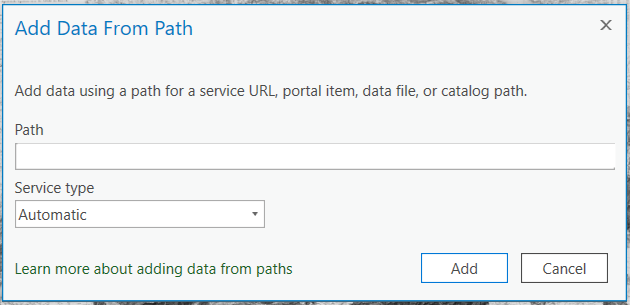
For the Path, go to the FastMap Workspace and load your desired layer. Then click on the information button in the footer of the website to see the metadata of the layer. From the metadata, click on the WMTS hyperlink, so that the URL is copied to your clipboard.
The format of the copied URL is as follows:
https://tiles.fastmap.ai/v1/OGC/wmts/{collection_name}:{mission_name}/WMTSCapabilities.xml
Change the above URL to the following:
All Web Map Services require authentication, and they can both accept API Keys or Auth0 authentication. In case you have obtained your API Key through the Workspace, you can provide your API Key in the URL as follows:
Select Automatic for the Service type.
Click OK to see the layer in your map.
AutoCAD
If you are using AutoCAD, you can easily include FastMap Web Map Services into your project.
WMW
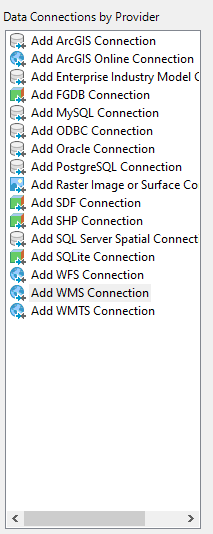
From Display Manager, click Data > Connect To Data to open Data Connect window. Select Add WMS Connection from the Data Connections By Provider list.
In Connection Name box, type a name for this connection.
For the URL, go to the FastMap Workspace and load your desired layer. Then click on the information button in the footer of the website to see the metadata of the layer. From the metadata, click on the WMS hyperlink, so that the URL is copied to your clipboard.
The format of the URL is as follows:
https://tiles.fastmap.ai/v1/OGC/wms?LAYERS={collection_name}:{mission_name}
Providing LAYERS parameter is important.
All Web Map Services require authentication, and they can both accept API Keys or Auth0 authentication. In case you have obtained your API Key through the Workspace, you can provide your API Key as follows:
https://tiles.fastmap.ai/v1/OGC/wms?LAYERS={collection_name}:{mission_name}&APIKEY={your_API_Key}
Paste the URL in the Server name or URL box.
Select 1.0.0 or 1.1.1 as the Version.
Click Connect. The User Name & Password window is displayed. Do not enter anything and click Login.
The Add Data to Map window appears in the connection window. Select the layer to include in your map. Click the Image Format drop down to the right of the layer name to choose the format. Click the Server CS Code drop down for the layer and choose from the available coordinate systems. Click the Layer CS Code drop down to select default. Also, leave Style as default.
Click Add To Map.
OpenLayers
WMS
To use FastMap WMS API in your JavaScript applications that use OpenLayers library, you can use the sample provided below.
import ImageWMS from 'ol/source/ImageWMS.js';
import Map from 'ol/Map.js';
import OSM from 'ol/source/OSM.js';
import View from 'ol/View.js';
import {Image as ImageLayer, Tile as TileLayer} from 'ol/layer.js';

const layers = [
  new TileLayer({
    source: new OSM(),
  }),
  new ImageLayer({
    source: new ImageWMS({
      url: 'https://tiles.fastmap.ai/v1/OGC/wms?',
      params: {
        LAYERS: '{collection_name}:{mission_name}',
        APIKEY: 'your_api_key',
      }
    }),
  }),
];
const map = new Map({
  layers: layers,
  target: 'map',
  view: new View({
    projection: 'EPSG:4326',
    center: [-97.176416,49.866430],
    zoom: 10,
  }),
});
WMTS
To use FastMap WMTS API in your JavaScript applications that use OpenLayers library, you can use the sample provided below.
import Map from 'ol/Map.js';
import OSM from 'ol/source/OSM.js';
import TileLayer from 'ol/layer/Tile.js';
import View from 'ol/View.js';
import WMTS, {optionsFromCapabilities} from 'ol/source/WMTS.js';
import WMTSCapabilities from 'ol/format/WMTSCapabilities.js';

const parser = new WMTSCapabilities();
let map;

fetch('https://tiles.fastmap.ai/v1/OGC/wmts/{collection_name}:{mission_name}/WMTSCapabilities.xml?APIKEY=your_api_key')
  .then(function (response) {
    return response.text();
  })
  .then(function (text) {
    let result = parser.read(text);
    const options = optionsFromCapabilities(result, {
      layer: '{collection_name}:{mission_name}',
      matrixSet: 'WebMercatorQuad',
    });
    map = new Map({
        layers: [
          new TileLayer({
            source: new OSM(),
            opacity: 1,
            zIndex: 2,
          }),
          new TileLayer({
            zIndex: 1,
            opacity: 1,
            source: new WMTS(options),
          }),
        ],
        target: 'map',
        view: new View({
          center: [-10824638.5688, 6429812.5499 ],
          zoom: 10,
        }),
    });
});